# flutter_unity_widget
[](#contributors-)
[![version][version-badge]][package]
[![MIT License][license-badge]][license]
[![PRs Welcome][prs-badge]](http://makeapullrequest.com)
[![Watch on GitHub][github-watch-badge]][github-watch]
[![Star on GitHub][github-star-badge]][github-star]
[](https://gitter.im/flutter-unity/community?utm_source=badge&utm_medium=badge&utm_campaign=pr-badge)
Flutter unity 3D widget for embedding unity in flutter. Now you can make awesome gamified features of your app in Unity and get it rendered in a Flutter app both in fullscreen and embeddable mode. Works great on Android and iOS. There are now two unity app examples in the unity folder, one with the default scene and another based on Unity AR foundation samples.
Note: I have updated the example for Unity 2019.3.5 and there are some new changes in the scripts folder. Please replace your already copied files and folders in your unity project
## Installation
First depend on the library by adding this to your packages `pubspec.yaml`:
```yaml
dependencies:
flutter_unity_widget: ^0.1.6+8
```
Now inside your Dart code you can import it.
```dart
import 'package:flutter_unity_widget/flutter_unity_widget.dart';
```
## Preview
30 fps gifs, showcasing communication between Flutter and Unity:


## Setup Project
For this, there is also a video tutorial, which you can find a [here](https://www.youtube.com/watch?v=exNPmv_7--Q).
### Add Unity Project
1. Create an unity project, Example: 'UnityDemoApp'.
2. Create a folder named `unity` in flutter project folder.
2. Move unity project folder to `unity` folder.
Now your project files should look like this.
```
.
├── android
├── ios
├── lib
├── test
├── unity
│ └── // Example: UnityDemoApp
├── pubspec.yml
├── README.md
```
### Configure Player Settings
1. First Open Unity Project.
2. Click Menu: File => Build Settings
Be sure you have at least one scene added to your build.
3. => Player Settings
**Android Platform**:
1. Make sure your `Graphics APIs` are set to OpenGLES3 with a fallback to OpenGLES2 (no Vulkan)
2. Change `Scripting Backend` to IL2CPP.
3. Mark the following `Target Architectures` :
- ARMv7 ✅
- ARM64 ✅
- x86 ✅ (In Unity Version 2019.2+, this feature is not avaliable due to the lack of Unity Official Support)
 **iOS Platform**:
1. This only works with Unity version >=2019.3 because uses Unity as a library!
2. Depending on where you want to test or run your app, (simulator or physical device), you should select the appropriate SDK on `Target SDK`.
**iOS Platform**:
1. This only works with Unity version >=2019.3 because uses Unity as a library!
2. Depending on where you want to test or run your app, (simulator or physical device), you should select the appropriate SDK on `Target SDK`.
### Add Unity Build Scripts and Export
Copy [`Build.cs`](https://github.com/snowballdigital/flutter-unity-view-widget/tree/master/scripts/unity_2019_3_5_later/Editor/Build.cs) and [`XCodePostBuild.cs`](https://github.com/snowballdigital/flutter-unity-view-widget/tree/master/scripts/unity_2019_3_5_later/Editor/XCodePostBuild.cs) to `unity//Assets/Scripts/Editor/`
Open your unity project in Unity Editor. Now you can export the Unity project with `Flutter/Export Android` (for Unity versions up to 2019.2), `Flutter/Export Android (Unity 2019.3.*)` (for Unity versions 2019.3 and up, which uses the new [Unity as a Library](https://blogs.unity3d.com/2019/06/17/add-features-powered-by-unity-to-native-mobile-apps/) export format), or `Flutter/Export IOS` menu.
 Android will export unity project to `android/UnityExport`.
IOS will export unity project to `ios/UnityExport`.
Android will export unity project to `android/UnityExport`.
IOS will export unity project to `ios/UnityExport`.
**Android Platform Only**
1. After exporting the unity game, open Android Studio and and add the `Unity Classes` Java `.jar` file as a module to the unity project. You just need to do this once if you are exporting from the same version of Unity everytime. The `.jar` file is located in the ```/android/UnityExport/lib``` folder
2. Add the following to your ```/android/settings.gradle```file:
```gradle
include ":UnityExport"
project(":UnityExport").projectDir = file("./UnityExport")
```
3. If using Unity 2019.2 or older, open `build.gradle` of `UnityExport` module and replace the dependencies with
```gradle
dependencies {
implementation project(':unity-classes') // the unity classes module you added from step 1
}
```
4. To build a release package, you need to add signconfig in `UnityExport/build.gradle`. The code below use the `debug` signConfig for all buildTypes, which can be changed as you well if you need specify signConfig.
```
buildTypes {
release {
signingConfig signingConfigs.debug
}
debug {
signingConfig signingConfigs.debug
}
profile{
signingConfig signingConfigs.debug
}
innerTest {
//...
matchingFallbacks = ['debug', 'release']
}
}
```
5. If you found the duplicate app icons on your launcher after installing the app, you can just open `UnityExport` Manifest file and comment the codes below
```gradle
//
//
//
//
//
```
**iOS Platform Only**
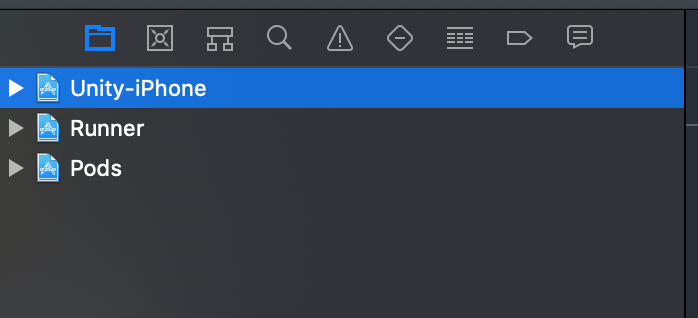
1. open your ios/Runner.xcworkspace (workspace!, not the project) in Xcode and add the exported project in the workspace root (with a right click in the Navigator, not on an item -> Add Files to “Runner” -> add the UnityExport/Unity-Iphone.xcodeproj file
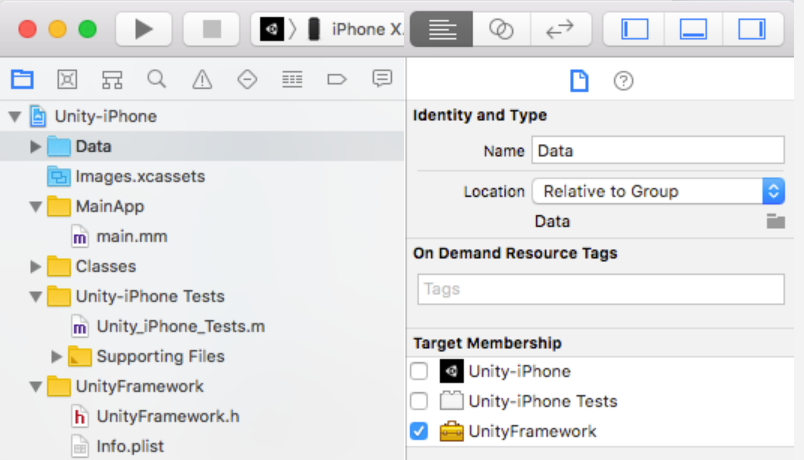
 2. Select the Unity-iPhone/Data folder and change the Target Membership for Data folder to UnityFramework
 3. Add this to your Runner/Runner/Runner-Bridging-Header.h
```c
#import "UnityUtils.h"
```
4. Add to Runner/Runner/AppDelegate.swift before the GeneratedPluginRegistrant call:
```swift
InitArgs(CommandLine.argc, CommandLine.unsafeArgv)
```
Or when using Objective-C your `main.m` should look like this:
```
#import "UnityUtils.h"
int main(int argc, char * argv[]) {
@autoreleasepool {
InitArgs(argc, argv);
return UIApplicationMain(argc, argv, nil, NSStringFromClass([AppDelegate class]));
}
}
```
5. Opt-in to the embedded views preview by adding a boolean property to the app's `Info.plist` file with the key `io.flutter.embedded_views_preview` and the value `YES`.
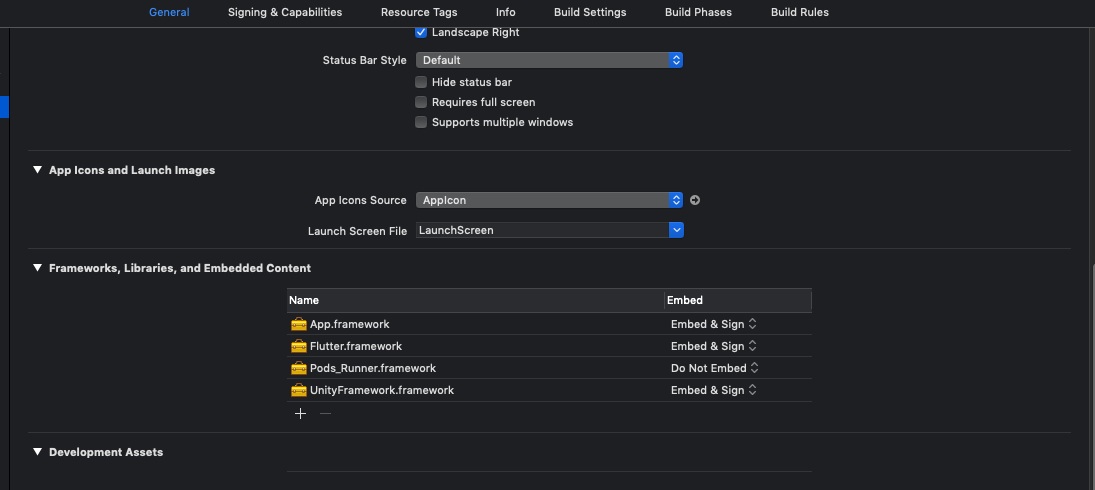
6. Add UnityFramework.framework as a Library to the Runner project
3. Add this to your Runner/Runner/Runner-Bridging-Header.h
```c
#import "UnityUtils.h"
```
4. Add to Runner/Runner/AppDelegate.swift before the GeneratedPluginRegistrant call:
```swift
InitArgs(CommandLine.argc, CommandLine.unsafeArgv)
```
Or when using Objective-C your `main.m` should look like this:
```
#import "UnityUtils.h"
int main(int argc, char * argv[]) {
@autoreleasepool {
InitArgs(argc, argv);
return UIApplicationMain(argc, argv, nil, NSStringFromClass([AppDelegate class]));
}
}
```
5. Opt-in to the embedded views preview by adding a boolean property to the app's `Info.plist` file with the key `io.flutter.embedded_views_preview` and the value `YES`.
6. Add UnityFramework.framework as a Library to the Runner project
### AR Foundation ( requires Unity 2019.3.*)

Check out the Unity AR Foundation Samples [Demo Repository](https://github.com/juicycleff/flutter-unity-arkit-demo)
**The Demo Repository is not guaranteed to be up-to-date with the latest flutter-unity-view-widget master. Make sure to follow the steps listed below for setting up AR Foundation on iOS and Android in your projects.**
**iOS**
Go to target info list on Xcode and add this key and value;
key: `Privacy - Camera Usage Description` value: `$(PRODUCT_NAME) uses Cameras`
**Android**
If you want to use Unity for integrating Augmented Reality in your Flutter app, a few more changes are required:
1. Export the Unity Project as previously stated (using the Editor Build script).
2. Check if the exported project includes all required Unity libraries (.so) files (`lib/\/libUnityARCore.so` and `libarpresto_api.so`). There seems to be a bug where a Unity export does not include all lib files. If they are missing, use Unity to build a standalone .apk of your AR project, unzip the resulting apk, and copy over the missing .lib files to the `UnityExport` module.
3. Similar to how you've created the `unity-classes` module in Android Studio, create similar modules for all exported .aar and .jar files in the `UnityExport/libs` folder (`arcore_client.aar`, `unityandroidpermissions.aar`, `UnityARCore.aar`).
4. Update the build.gradle script of the `UnityExport` module to depend on the new modules (again, similar to how it depends on `unity-classes`).
5. Finally, update your Dart code build method where you include the `UnityWidget` and add `isARScene: true,`.
Sadly, this does have the side effect of making your Flutter activity act in full screen, as Unity requires control of your Activity for running in AR, and it makes several modifications to your Activity as a result (including setting it to full screen).
### Add UnityMessageManager Support
Copy [`UnityMessageManager.cs`](https://github.com/snowballdigital/flutter-unity-view-widget/tree/master/scripts/unity_2019_3_5_later/UnityMessageManager.cs) to your unity project.
Copy this folder [`JsonDotNet`](https://github.com/snowballdigital/flutter-unity-view-widget/tree/master/scripts/unity_2019_3_5_later/JsonDotNet) to your unity project.
Copy [`link.xml`](https://github.com/snowballdigital/flutter-unity-view-widget/tree/master/scripts/unity_2019_3_5_later/link.xml) to your unity project.
(2019.3.5* only) Copy this folder [`Plugins`](https://github.com/snowballdigital/flutter-unity-view-widget/tree/master/scripts/unity_2019_3_5_later/Plugins) to your unity project.
### Vuforia
**Android**
Similar to setting up AR Foundation, but creating a module for the VuforiaWrapper instead.
Thanks to [@PiotrxKolasinski](https://github.com/PiotrxKolasinski) for writing down the exact steps:
1. Change in build.gradle: `implementation(name: 'VuforiaWrapper', ext:'aar')` to `implementation project(':VuforiaWrapper')`
2. In settings.gradle in the first line at the end add: `':VuforiaWrapper'`
3. From menu: File -> New -> New Module choose "import .JAR/.AAR Package" and add lib VuforiaWrapper.arr. Move generated folder to android/
4. In Widget UnityWidget add field: `isARScene: true`
5. Your App need camera permission (you can set in settings on mobile)
## Examples
### Simple Example
```dart
import 'package:flutter/material.dart';
import 'package:flutter/services.dart';
import 'package:flutter_unity_widget/flutter_unity_widget.dart';
class UnityDemoScreen extends StatefulWidget {
UnityDemoScreen({Key key}) : super(key: key);
@override
_UnityDemoScreenState createState() => _UnityDemoScreenState();
}
class _UnityDemoScreenState extends State{
static final GlobalKey _scaffoldKey =
GlobalKey();
UnityWidgetController _unityWidgetController;
Widget build(BuildContext context) {
return Scaffold(
key: _scaffoldKey,
body: SafeArea(
bottom: false,
child: WillPopScope(
onWillPop: () {
// Pop the category page if Android back button is pressed.
},
child: Container(
color: colorYellow,
child: UnityWidget(
onUnityViewCreated: onUnityCreated,
),
),
),
),
);
}
// Callback that connects the created controller to the unity controller
void onUnityCreated(controller) {
this._unityWidgetController = controller;
}
}
```
### Communicating with and from Unity
```dart
import 'package:flutter/material.dart';
import 'package:flutter_unity_widget/flutter_unity_widget.dart';
void main() => runApp(MyApp());
class MyApp extends StatefulWidget {
@override
_MyAppState createState() => _MyAppState();
}
class _MyAppState extends State {
static final GlobalKey _scaffoldKey =
GlobalKey();
UnityWidgetController _unityWidgetController;
double _sliderValue = 0.0;
@override
void initState() {
super.initState();
}
@override
Widget build(BuildContext context) {
return MaterialApp(
home: Scaffold(
key: _scaffoldKey,
appBar: AppBar(
title: const Text('Unity Flutter Demo'),
),
body: Card(
margin: const EdgeInsets.all(8),
clipBehavior: Clip.antiAlias,
shape: RoundedRectangleBorder(
borderRadius: BorderRadius.circular(20.0),
),
child: Stack(
children: [
UnityWidget(
onUnityViewCreated: onUnityCreated,
isARScene: false,
onUnityMessage: onUnityMessage,
),
Positioned(
bottom: 20,
left: 20,
right: 20,
child: Card(
elevation: 10,
child: Column(
children: [
Padding(
padding: const EdgeInsets.only(top: 20),
child: Text("Rotation speed:"),
),
Slider(
onChanged: (value) {
setState(() {
_sliderValue = value;
});
setRotationSpeed(value.toString());
},
value: _sliderValue,
min: 0,
max: 20,
),
],
),
),
),
],
),
),
),
);
}
// Communcation from Flutter to Unity
void setRotationSpeed(String speed) {
_unityWidgetController.postMessage(
'Cube',
'SetRotationSpeed',
speed,
);
}
// Communication from Unity to Flutter
void onUnityMessage(controller, message) {
print('Received message from unity: ${message.toString()}');
}
// Callback that connects the created controller to the unity controller
void onUnityCreated(controller) {
this._unityWidgetController = controller;
}
}
```
## API
- `pause()` (Use this to pause unity player)
- `resume()` (Use this to resume unity player)
- `postMessage(String gameObject, methodName, message)` (Allows you invoke commands in Unity from flutter)
- `onUnityMessage(data)` (Unity to flutter bindding and listener)
## Known issues
- Android Export requires several manual changes
- Using AR will make the activity run in full screen (hiding status and navigation bar).
[version-badge]: https://img.shields.io/pub/v/flutter_unity_widget.svg?style=flat-square
[package]: https://pub.dartlang.org/packages/flutter_unity_widget/
[license-badge]: https://img.shields.io/github/license/snowballdigital/flutter-unity-view-widget.svg?style=flat-square
[license]: https://github.com/snowballdigital/flutter-unity-view-widget/blob/master/LICENSE
[prs-badge]: https://img.shields.io/badge/PRs-welcome-brightgreen.svg?style=flat-square
[prs]: http://makeapullrequest.com
[github-watch-badge]: https://img.shields.io/github/watchers/snowballdigital/flutter-unity-view-widget.svg?style=social
[github-watch]: https://github.com/snowballdigital/flutter-unity-view-widget/watchers
[github-star-badge]: https://img.shields.io/github/stars/snowballdigital/flutter-unity-view-widget.svg?style=social
[github-star]: https://github.com/snowballdigital/flutter-unity-view-widget/stargazers
## Contributors ✨
Thanks goes to these wonderful people ([emoji key](https://allcontributors.org/docs/en/emoji-key)):
This project follows the [all-contributors](https://github.com/all-contributors/all-contributors) specification. Contributions of any kind welcome!


